Notice: A non well formed numeric value encountered in C:\ClientSites\bestaspnethostingreview.com\httpdocs\wp-content\plugins\crayon-syntax-highlighter\crayon_formatter.class.php on line 118
Notice: A non well formed numeric value encountered in C:\ClientSites\bestaspnethostingreview.com\httpdocs\wp-content\plugins\crayon-syntax-highlighter\crayon_formatter.class.php on line 119
BestASPNETHostingReview.com | Best and cheap ASP.NET hosting. ASP.NET Identity is a simple but robust framework allowing you to easily inject custom authentication logic into your applications.
ASP.NET Identity is the latest in a series of frameworks that exist as part of ASP.NET for authenticating users. There are many ways for users to be authenticated, but ASP.NET Identity handles the complex logic involving password hashing, generating and securing user tokens, and other such things that exist as “solved” problems. It also allows you to easily plug in custom data stores or implementations of whichever logic needs to be overridden.
To clear up some potential confusion, I should mention two words that are often seen when dealing with access control: authentication and authorization. These are two separate pieces of access control, but are sometimes incorrectly used interchangeably.
Authentication is the first step, which is to determine that the user actually is who they are claiming to be. For a long time this has been done with a username and password, where the username represents who the user is claiming to be and the password is the proof that they are that person (operating under the assumption that no one else knows the password). Two-factor authentication, now rapidly increasing in popularity, takes it a step further by requiring the user to supply an additional piece of information.
Once a user has been authenticated, the next step is to check to see if that user is authorized to do what they’re trying to do. If you’ve used ASP.NET MVC at all, then you’re probably used to protecting actions by using the [Authorize] attribute like this:
1 2 3 4 5 | [Authorize] public IActionResult Index() { return View(); } |
In this example, I’m using the authorize attribute to protect the Index action from being called. Because I’m not specifying any conditions I’m allowing any user that’s authenticated to perform this action.
To be more specific and allow only members of a certain role (in this case the “Administrators” role) to perform the action, I can add the role as a requirement to the attribute like this:
1 2 3 4 5 | [Authorize(Roles = "Administrators")] public IActionResult Index() { return View(); } |
Where Identity Comes In
ASP.NET Identity comes into play when you want to change how user information is accessed, validated and stored. If you were to spin up a new application using one of the templates that use authentication, you would get identity already built in and set up to store users in a SQL database by way of Entity Framework. But a common real-world scenario is the need for a new application to either integrate with a pre-existing user database, or even to store users in a non-traditional data store. And these are the scenarios in which Identity really shines.
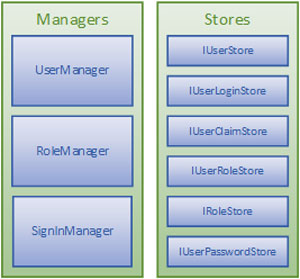
Identity is based on two important abstractions: managers and stores. Managers are abstractions over higher-level functions, such as creating and authenticating users. They do this by taking a dependency on stores, which are abstractions of the lower-level data access functions, such as saving a user or retrieving his password hash. Some common managers and stores you’ll be interacting with are shown in Figure 1.

In a typical user sign-in scenario, like in Figure 2, a user will make a POST request to an action in an MVC controller, providing her username and password.

The controller will call a sign-in method on a SignInManager passing in that same information. The manager’s job is to then call into various stores and validate things. For example, it might take the following steps:
- Call into the UserStore and get the user by name (to ensure the user exists and isn’t disabled or locked out).
- Hash the provided password using a password hasher (either the default one or a custom implementation).
- Call into the UserPasswordStore and get the password hash for that user.
- Compare the stored password hash to the hash of the provided password. If they match, populate the current identity in the HttpContext with the user object, and return a success back to the controller.
Custom Stores
To demonstrate how to customize ASP.NET Identity, I start by opening up Visual Studio and creating a new project from a template with ASP.NET Identity already added.
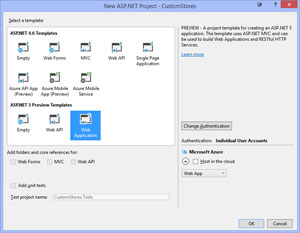
From within Visual Studio, I create a new project by selecting the ASP.NET Web Application template under .NET Framework 4.6. I then choose Web Application from under the ASP.NET 5 Preview Templates. At the right side of the window, it should show Authentication: Individual User Accounts (see Figure 3).

Looking through the template, Identity is present throughout. Start by taking a look at the AccountController. In its constructor it takes a dependency on two of the managers: UserManager and SignInManager. The SignInManager is used in both the POST action to /Account/Login to sign a user in, and the POST action to /Account/LogOff to sign the user out. It’s also used to sign a user in immediately after user creation, and in the methods related to two-factor authentication, which I will explore later in this series (and, yes, I’m just getting started, so stay tuned!). The UserManager is used in the actions that create a new user, confirm the user’s e-mail address and allow a user to reset his forgotten password.
One thing I haven’t yet mentioned is that managers don’t necessarily need to be wholly reimplemented to customize their logic. The base manager classes expose a lot of core logic through what are called providers. Providers are just implementations of one particular thing, such as user validation, for example. To demonstrate this, I’ve created a custom user validation class that requires that all e-mail addresses end in @example.com. The code for this class exists in Listing 1.
Listing 1: Custom User Validator That Requires E-Mail Addresses to End in @example.com
1 2 3 4 5 6 7 8 9 10 11 12 13 14 15 16 17 18 | public class CustomUserValidator : UserValidator<ApplicationUser> { public override async Task<IdentityResult> ValidateAsync(UserManager<ApplicationUser> manager, ApplicationUser user) { IdentityResult baseResult = await base.ValidateAsync(manager, user); List<IdentityError> errors = new List<IdentityError>(baseResult.Errors); if (!user.Email.EndsWith("@example.com")) { IdentityError invalidEmailError = Describer.InvalidEmail(user.Email); invalidEmailError.Description += " Email address must end with @example.com"; errors.Add(invalidEmailError); } return errors.Count > 0 ? IdentityResult.Failed(errors.ToArray()) : IdentityResult.Success; } } |
This follows a common pattern within Identity, where you can either implement the interface (in this case IValidator<T>) and provide all of the validation code, or override the base implementation of it and add additional logic by overriding methods as I did here.
Then to plug this in, head over to the Startup.cs file and find the ConfigureServices method. Somewhere before the line starting with services.AddIdentity, add the following line:
1 | services.AddTransient<IUserValidator<ApplicationUser>, CustomUserValidator>(); |
This will add the implementation of CustomUserValidator to the internal services collection, allowing it to be injected anywhere that an IUserValidator<ApplicationUser> is required. Under the hood this uses a simple dependency injection container. If you’re not familiar with dependency injection, you might want to take a look at my series on the topic.
Once complete, you can run the application and try to register a user with an e-mail address outside of example.com. If everything has been wired up correctly you should see an error message like the one in Figure 4.

Two-Factor Authentication and More, To Come
I hope I’ve provided you with a good overview of ASP.NET Identity and some of the possibilities it opens up. In this article I only looked at the Entity Framework implementation provided in the templates so that I could focus on pieces of the system, rather than the system as a whole.
As I continue this series I’ll dive deeper into the framework, covering things such as custom stores and two-factor authentication, ultimately demonstrating how to add ASP.NET Identity to a project that has no existing authentication scheme and wiring it up to an arbitrary data store.
